
Learning how to hold a pen correctly is one of the first steps to improving your handwriting. The way you grip your pen, position your worksheet, sit at your desk, and move your hand can all affect how comfortably and consistently you write.
Many people focus only on practicing letters. However, if you use too much pressure or rely entirely on your fingers, your hand can become tired or painful after a short time. This makes it difficult to practice for longer periods and can cause your handwriting to become less consistent.
A comfortable pen grip and natural hand movement can help you write with better control while reducing unnecessary tension.
Why Is a Correct Pen Grip Important?
A correct pen grip should give you enough control to guide the pen without creating excessive tension.
When you hold a pen too tightly, your fingers and hand have to work harder than necessary. Over time, this can contribute to hand fatigue, finger discomfort, wrist tension, and difficulty writing for long periods.
A relaxed grip allows the pen to move more naturally across the page.
The goal is not to hold the pen as tightly as possible. Instead, you want a stable grip that allows your fingers, wrist, and hand to work together.
How to Hold a Pen Correctly
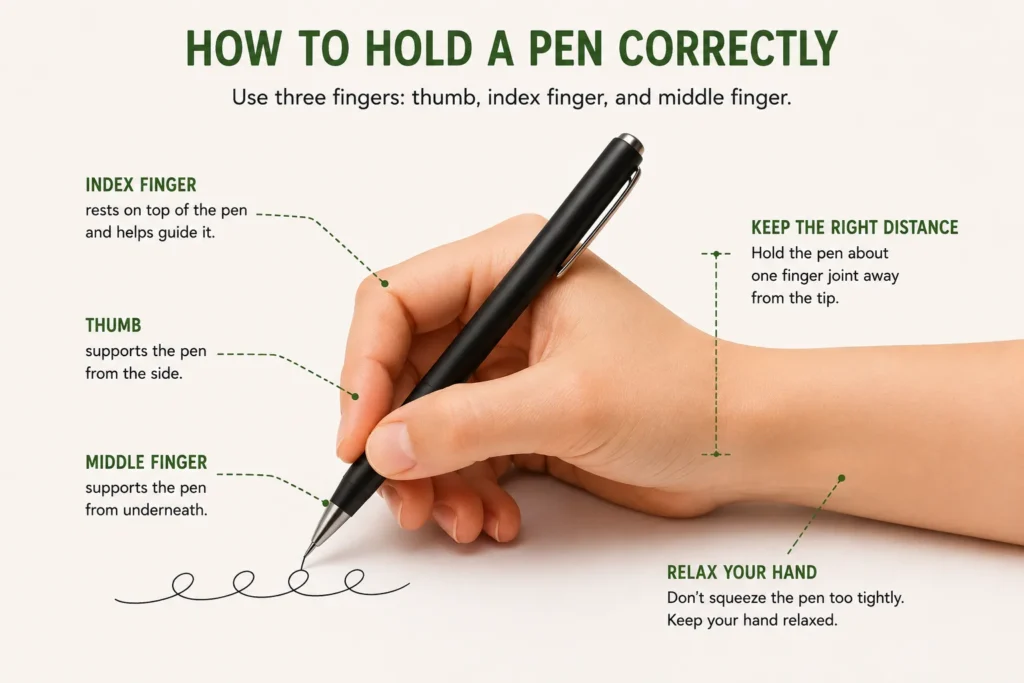
The easiest way to learn how to hold a pen correctly is to start with three fingers: your thumb, index finger, and middle finger.
Your index finger rests gently on top of the pen and helps guide it.
Your thumb supports the pen from the side.
Your middle finger supports the pen from underneath.
These three fingers create a stable tripod-like grip while allowing the pen to move freely.
Your ring finger and little finger can rest naturally on the worksheet and provide additional support as your hand moves across the page.
The important thing is to keep your fingers relaxed. You should be able to control the pen without squeezing it tightly.
Keep Your Fingers About One Finger Joint Away From the Tip
Another important part of how to hold a pen correctly is the distance between your fingers and the writing tip.
Try holding the pen approximately one finger joint away from the tip.
This position gives you enough space to see your writing while allowing your fingers to move comfortably.
Holding the pen too close to the tip can encourage small and tense finger movements. Holding it too far away may make the pen harder to control.
Use one finger joint as a starting point, then make small adjustments depending on the size of your hand and the type of pen you are using.
Keep Your Grip Relaxed
A common handwriting mistake is gripping the pen too tightly.
Your fingers should hold the pen securely, but they should not squeeze it.
Try this simple exercise.
Hold your pen and write a few lines normally. Then consciously relax your thumb, index finger, and middle finger while maintaining control of the pen.
You should notice that the pen can move with less effort.
A relaxed grip is especially important when practicing handwriting every day because unnecessary tension can make your hand tired much faster.
Use Your Wrist and Hand, Not Only Your Fingers
Learning how to hold a pen correctly is only part of developing good handwriting technique. You also need to learn how to move the pen.
One of the most useful habits is to avoid making every movement with only your fingertips.
Your fingers are important for controlling the pen and making small details. However, larger strokes should involve your wrist and hand.
When you rely only on your fingers, your range of movement is small. Your strokes can become tight, short, and uneven.
Instead, allow your wrist and hand to guide larger movements across the page.
This can help you create wider, smoother, and more consistent strokes.
This technique is especially useful for cursive handwriting and calligraphy, where flowing curves and continuous movements are important.
Think of your fingers as controlling the pen while your wrist and hand create the larger movement.
Practice Oval Shapes Before Writing Letters
Before starting your handwriting practice, spend a few minutes practicing oval shapes.
Oval exercises are a simple way to warm up your hand and practice continuous movement.
Start with small ovals and focus on keeping your grip relaxed.
Then gradually practice larger ovals and connected ovals.
For example:
oooooo
Try to keep the ovals similar in size, angle, and spacing.
Do not focus on speed. Focus on making each movement smooth and controlled.
As you become more comfortable, allow your wrist and hand to participate more in the movement instead of drawing every oval only with your fingers.
Why Oval Practice Helps Your Handwriting
Many handwriting letters contain rounded and curved movements.
Letters such as a, c, e, o, m, and n all require controlled curves.
Practicing ovals repeatedly helps you become more familiar with these movements before you apply them to individual letters.
Oval exercises can help you practice:
Smooth pen movement
Consistent stroke size
Even spacing
Controlled curves
Better hand coordination
A few minutes of oval practice can therefore be a useful warm-up before working through a handwriting worksheet.
Sit With Your Back Straight
Good handwriting technique starts with more than your hand.
Your sitting posture also matters.
When practicing handwriting, sit with your back straight and your shoulders relaxed.
Keep both feet comfortably supported and avoid leaning your entire body over the worksheet.
Your head should remain at a comfortable distance from the page.
You do not need to sit rigidly. The goal is to create a balanced position that allows your arms and hands to move naturally.
A comfortable posture can make handwriting practice easier, particularly when you are writing for an extended period.
Position Your Worksheet at a Slight Angle
Your worksheet does not need to be perfectly straight in front of you.
Place the page at a slight angle that allows your writing hand to move naturally across the lines.
Right-handed writers often find it comfortable to rotate the worksheet slightly counterclockwise.
Left-handed writers may prefer to rotate the worksheet slightly clockwise.
The exact angle is personal. What matters is that your wrist and forearm can move freely without being forced into an awkward position.
If your wrist feels twisted or uncomfortable, adjust the position of the paper instead of forcing your hand to stay in one position.
How Right-Handed Writers Should Use Their Hands
If you write with your right hand, your right hand controls the pen while your left hand helps stabilize the worksheet.
Place your left hand gently on the page so the paper does not move while you write.
As you move across the worksheet, you can reposition your left hand to continue stabilizing the page.
Your writing hand should focus on controlling the pen, while your other hand keeps the paper stable.
How Left-Handed Writers Should Use Their Hands
If you write with your left hand, your left hand controls the pen while your right hand helps stabilize the worksheet.
Place your right hand on the page to prevent it from sliding as you write.
Left-handed writers may also need to experiment with the angle of the worksheet to find a position that allows the wrist and forearm to move comfortably.
The principle is the same for both writing styles:
One hand writes. The other hand stabilizes the paper.
Why Does My Hand Hurt When I Write?
If your hand becomes tired or painful after writing for only a short time, your technique may be creating unnecessary tension.
Some common factors include holding the pen too tightly, pressing too hard against the paper, holding the pen too close to the tip, relying entirely on finger movement, bending the wrist excessively, or sitting in an uncomfortable position.
Writing should not require constant excessive force.
If your hand becomes uncomfortable, stop and check your grip, posture, worksheet position, and pen pressure.
Do not simply continue writing through significant pain.
If pain is persistent, severe, or continues outside of writing, consider speaking with an appropriate healthcare professional.
A Simple Handwriting Warm-Up
Before practicing letters, take a few minutes to warm up your hand.
Start with simple slant strokes.
Then practice small ovals.
Move on to medium and larger ovals.
Finally, practice connected ovals and simple curves.
During the warm-up, focus on keeping your grip relaxed and allowing your wrist and hand to participate in the movement.
Once your hand feels comfortable, begin practicing individual letters.
This simple routine can make your handwriting practice more structured and help you focus on consistent movement rather than immediately worrying about perfect letter shapes.
Common Pen Grip Mistakes
Holding the Pen Too Tightly
A tight grip can create unnecessary tension and make your hand tired quickly.
Try relaxing your thumb and index finger while maintaining enough control to guide the pen.
Holding the Pen Too Close to the Tip
Holding the pen directly next to the writing tip can restrict your finger movement.
Try moving your fingers approximately one finger joint away from the tip.
Moving Only Your Fingers
Small finger movements are useful, but relying entirely on your fingers can make larger strokes difficult.
Allow your wrist and hand to participate in wider movements.
Keeping the Worksheet Completely Straight
A perfectly straight worksheet is not always the most comfortable position.
Try rotating the page slightly so your writing hand can move naturally across the lines.
Pressing Too Hard
You do not need to press the pen heavily into the paper.
Use enough pressure to create a clear line while keeping your hand relaxed.
A Simple Checklist Before You Start Writing
Before beginning your handwriting practice, check your position.
Three fingers: Hold the pen with your thumb, index finger, and middle finger.
One finger joint: Keep your fingers approximately one finger joint away from the pen tip.
Relaxed grip: Hold the pen securely without squeezing it.
Straight back: Sit upright and keep your shoulders relaxed.
Angled worksheet: Position the paper at a comfortable slight angle.
Supporting hand: Use your other hand to stabilize the worksheet.
Wrist movement: Allow your wrist and hand to participate in larger strokes.
Oval warm-up: Practice ovals before moving on to letters.
Light pressure: Avoid pressing the pen into the paper unnecessarily.
How to Practice Handwriting More Comfortably
Improving handwriting is not simply about repeating letters hundreds of times.
Your pen grip, posture, worksheet position, wrist movement, and practice routine all affect how you write.
Start by learning how to hold a pen correctly. Then practice a few rows of ovals to warm up your hand.
After that, move on to individual letters, words, and sentences.
Focus on smooth movement rather than speed.
With regular practice, you can gradually work on letter formation, spacing, size, slant, and consistency.
Most importantly, do not ignore hand pain. If your hand hurts every time you practice, review your writing technique instead of simply practicing for longer.
Start Your Handwriting Practice
Now that you know how to hold your pen, position your worksheet, and use your wrist and hand, you can start practicing.
Begin with a few rows of ovals, then move on to individual letters and words.
A short 5–10 minute handwriting practice session can be a simple way to build a consistent daily routine.
Ready to practice?
Frequently Asked Questions
How should I hold a pen correctly?
Hold the pen with your thumb, index finger, and middle finger. Keep your fingers approximately one finger joint away from the tip and maintain a relaxed grip.
How far from the tip should I hold a pen?
A useful starting point is about one finger joint away from the writing tip. Adjust the distance slightly if needed to find a comfortable position.
Should I move my fingers or wrist when writing?
Both are involved, but avoid relying entirely on your fingers. Use your fingers for smaller movements while allowing your wrist and hand to create wider, smoother strokes.
Why should I practice ovals before handwriting?
Oval exercises help warm up your hand and develop smoother, more consistent movements. They also prepare you for the curves found in many handwriting letters.
How should I position my worksheet?
Place the worksheet at a slight angle that allows your wrist and forearm to move comfortably. Right-handed writers often prefer a slight counterclockwise angle, while left-handed writers may prefer a slight clockwise angle.
What should my other hand do when writing?
Your non-writing hand should stabilize the worksheet. Right-handed writers can use their left hand, while left-handed writers can use their right hand.
Why does my hand hurt when I write?
Excessive grip pressure, awkward posture, excessive finger movement, or an uncomfortable wrist position can contribute to hand discomfort. If pain is persistent or significant, stop writing and seek appropriate professional advice.
How long should I practice handwriting?
Start with around 5–10 minutes per day. Consistent and comfortable practice is more useful than forcing yourself to continue when your hand is already tired.